PX4 Bootloader Flashing onto Betaflight Systems
本页介绍如何将PX4引导加载程序闪存到已经用Betaflight闪存的板上 (e.g. OmnibusF4 SD or Kakute F7).
有三种工具可用于刷新PX4引导加载程序:Betaflight Configurator, dfu-util command line tool, or the graphical dfuse (Windows only).
INFO
_Betaflight Configurator_最简单,但较新版本可能不支持非beta版本的引导加载程序更新。 您可以先尝试一下,但如果固件更新不起作用,请使用其他方法。
Betaflight Configurator Bootloader Update
INFO
_截至2023年5月,Betaflight Configurator_可能不支持PX4 Bootloader更新。 旧版本应该可以工作,尽管确切的版本尚不清楚。
要使用_Betaflight Configurator_安装PX4引导加载程序:
Download or build bootloader firmware for the board you want to flash.
Download the Betaflight Configurator for your platform.
TIP
如果使用_Chrome_web浏览器,一个简单的跨平台替代方案是将配置器安装为 extension from here.
:::
将飞控板连接到 PC 并启动 Betaflight 配置器。
Press the Load Firmware [Local] button
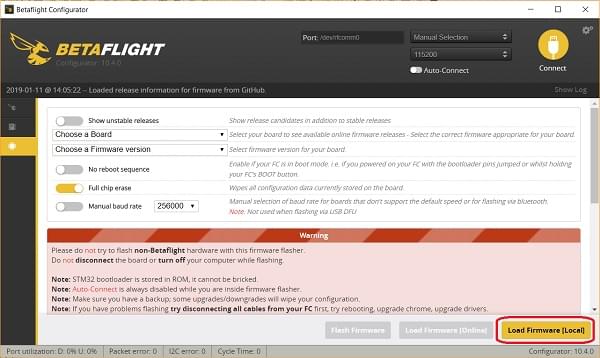
从文件系统中选择 bootloader 二进制文件,然后烧写进飞控板的 flash。
现在,您应当可以在飞控板上安装 PX4 固件了。
DFU Bootloader Update
本节解释了如何使用 dfu-util or the graphical dfuse tool (Windows only).
您首先需要下载或构建 bootloader firmware 对于您要闪存的电路板 (以下称为 <target.bin>).
INFO
以下所有方法都是安全的,因为STM32 MCU不能被砖砌! DFU 不会被烧写覆盖,并且总是允许安装新固件,即便烧写失败。
DFU mode
这两种工具都要求电路板处于DFU模式。 要进入 DFU 模式, 当将 USB 连接到电脑时按住启动按钮。 板通电后可以松开按钮。
dfu-util
INFO
The Holybro Kakute H7 v2, Holybro Kakute H7 and mini flight 控制器可能要求您首先运行一个附加命令来擦除闪存参数 (in order to fix problems with parameter saving):
dfu-util -a 0 --dfuse-address 0x08000000:force:mass-erase:leave -D build/<target>/<target>.bin该命令可能会生成一个可以忽略的错误。 完成后,再次进入DFU模式以完成常规闪烁。
要将引导加载程序闪存到飞行控制器上:
dfu-util -a 0 --dfuse-address 0x08000000 -D build/<target>/<target>.bin重新启动飞控板,并且不要按下启动按钮。
dfuse
The dfuse manual can be found here: https://www.st.com/resource/en/user_manual/cd00155676.pdf
Use the tool to flash the <target>.bin file.
Bootloader Firmware
上面的工具闪存预构建了引导加载程序固件。 Bootloader固件可以使用正常的PX4源代码为大多数目标构建,而其他目标只能使用Bootloader存储库中的源代码构建。
配备PX4自动驾驶仪的飞行控制器 make 目标,可以从PX4自动驾驶仪源构建引导加载程序。 通过运行以下命令可以获得此应用的控制器列表 make command, and noting the make targets that end in _bootloader
$make list_config_targets

...
cuav_nora_bootloader
cuav_x7pro_bootloader
cubepilot_cubeorange_bootloader
holybro_durandal-v1_bootloader
holybro_kakuteh7_bootloader
holybro_kakuteh7v2_bootloader
holybro_kakuteh7mini_bootloader
matek_h743-mini_bootloader
matek_h743-slim_bootloader
modalai_fc-v2_bootloader
mro_ctrl-zero-classic_bootloader
mro_ctrl-zero-h7_bootloader
mro_ctrl-zero-h7-oem_bootloader
mro_pixracerpro_bootloader
px4_fmu-v6u_bootloader
px4_fmu-v6x_bootloader
要为这些飞行控制器构建,请下载并构建 PX4-Autopilot source, 然后使用以下命令制作目标:
git clone --recursive https://github.com/PX4/PX4-Autopilot.git
cd PX4-Autopilot
make <target> # For example: holybro_kakuteh7mini_bootloader
对于其他飞行管制员,请下载 PX4/Bootloader 存储库,并使用适当的目标构建源代码:
git clone --recursive  https://github.com/PX4/Bootloader.git
cd Bootloader
make <target> # For example: omnibusf4sd_bl or kakutef7_bl
重新安装 Beatflight 固件
要切换回_Betaflight_:
- 备份PX4参数。 You can do this by exporting 将它们存储到SD卡中。
- 保持 the bootloader 连接USB电缆时按下按钮e
- Flash Betaflight as usual with the Betaflight-configurator